


Hi, here we create a basic CRUD todo app having frontend in Angular and backend on Springboot. and will also deploy our application on Vercel(for frontend) and Render(for backend). We’ll be using IntelliJ IDEA Community version 2024.1.4 for this project. I’ll also be providing Github link at the end of this guide for your reference.
Let’s start with initializing the spring backend first!
Part 1: Initializing Backend
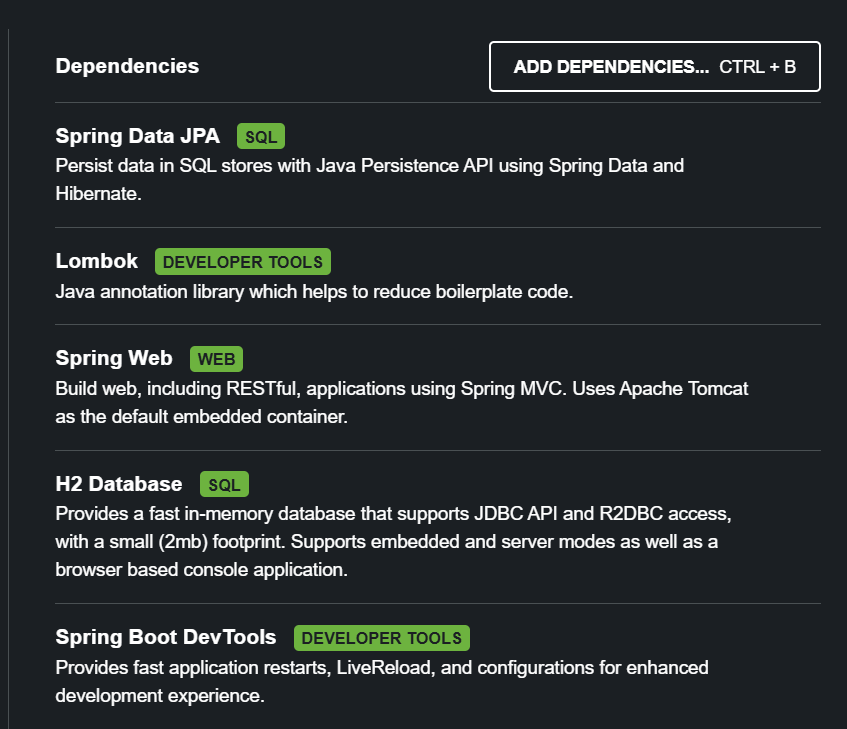
Step 1: We can initialize our spring project through spring initializer, we can add the following dependencies.
Project — Gradle-Groovy
Language — Java
Spring Boot — 3.4.1
Group — com.example(Depending on your use case, you can modify it)
Artifact — sample (Depending on your use case, you can modify it)
Name — sample (Depending on your use case, you can modify it)
Package name — com.example.sample
Packaging — Jar
Java — 23
Step 2: Opening the Project
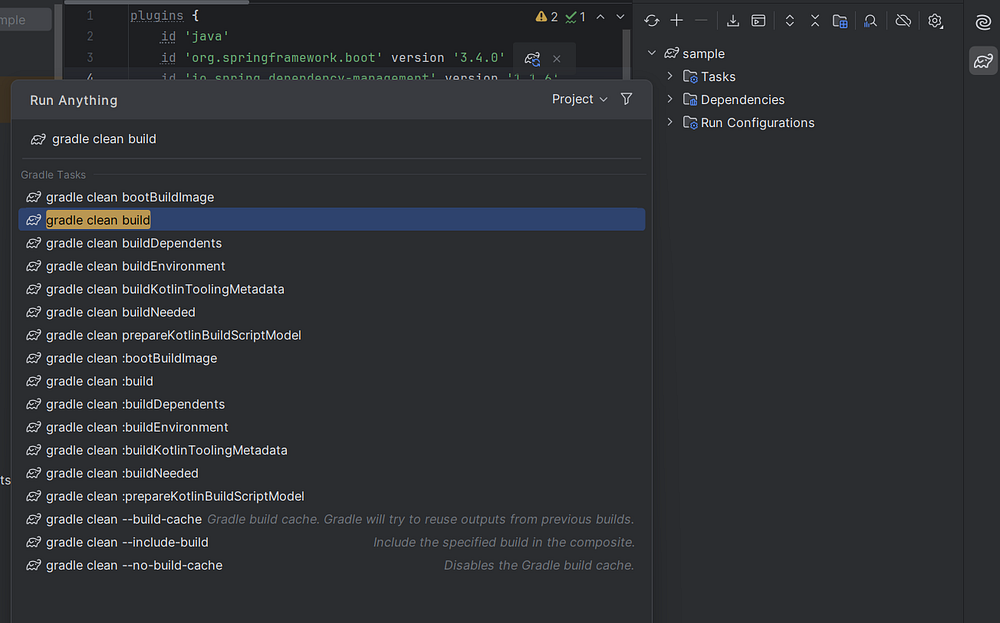
then download the zip file, extract and open the project on IntelliJ IDEA. Run the Gradle script(build.gradle) by clicking on the Gradle icon and selecting the command gradle clean build
Wohoo, you’ve initialized a basic spring application in your machine. If u’re encountering errors related to java version, then ensure you have the same version of Gradle JVM in the project settings.
Step 3: Create the Model
Spring works on the MVC ( Model, View and Controller) architecture:
Model contains the POJOs( Plain Old Java Objects) that handle data. It is responsible for managing the application’s data, business logic, and rules. Under src/main/java/com.example.sample, create a package named model, under which create a Java class named Todo.
package com.example.sample.model;
import jakarta.persistence.*;
import lombok.AllArgsConstructor;
import lombok.Data;
import lombok.NoArgsConstructor;

@NoArgsConstructor
@AllArgsConstructor
@Entity
@Data
public class Todo {
    @Id
    @GeneratedValue(strategy = GenerationType.IDENTITY)
    private long id;
    private String title;
    private String desc;
}
@NoArgsConstructor and @AllArgsConstructor and @Data annotations belong to the Lombok library. The first two as the name suggests generate the default constructor and constructor with all the fields as arguments respectively.The @Data annotation generates all the getters, setters, toString() and other methods thus reducing a lot of boilerplate code.
The @Entity annotation is from jakarta.persistence library, which provides annotations and interfaces for mapping Java objects to database tables using JPA.
Step 4: Create the Repository
It interacts with the database to handle data persistence and retrieval via an interface that extends Spring Data’s JPA repository providing methods for common CRUD operations (Create, Read, Update, Delete) and often supports query methods.
Given on the basic CRUD operations, specific methods need not be implemented here as built-in methods like findById(), deleteById(), save() etc already handle these operations.
package com.example.sample.repository;

import com.example.sample.model.Todo;
import org.springframework.data.jpa.repository.JpaRepository;
import org.springframework.stereotype.Repository;


@Repository
public interface TodoRepository extends JpaRepository<Todo,Long>{

}
Note*: In the declaration “JpaRepository<Todo, Long>” the term “Todo” represents the entity, while “Long” signifies the data type of the identifier for this entity.*
Step 5: Creating the Controller
It handles user inputs( API requests in form of HTTP) and generates appropriate response to the user. Generally, the main business logic is written in a separate service layer while the controller responsible only for handling the user requests and generating responses accordingly but we can skip service part and write all the logic here also.
Our TodoController will look like this-
package com.example.sample.controller;
import com.example.sample.model.Todo;
import com.example.sample.repository.TodoRepository;
import org.springframework.beans.factory.annotation.Autowired;

import org.springframework.web.bind.annotation.*;

import java.util.List;
import java.util.Optional;

@RestController
@RequestMapping("api/")
public class TodoController {
     @Autowired
     private TodoRepository todoRepository;

    @GetMapping("todos")
    public List<Todo> getTodos(){
        return this.todoRepository.findAll();
    }

    @PostMapping("todos")
    public Todo addTodo(@RequestBody Todo todo) {
        return this.todoRepository.save(todo);
    }

    @PatchMapping("todos/{id}")
    public Todo updateTodo(@PathVariable Long id, @RequestBody Todo todo){
        Optional<Todo> optionalTodo = todoRepository.findById(id);
        if(optionalTodo.isPresent()){
            Todo existingTodo = optionalTodo.get();
            existingTodo.setTitle(todo.getTitle());      // Update title
            existingTodo.setDesc(todo.getDesc());
            return this.todoRepository.save(existingTodo);
        }else {
            throw new RuntimeException("Todo not found with id " + id);
        }

    }

    @DeleteMapping("todos/{id}")
    public void deleteTodo(@PathVariable Long id) {
        this.todoRepository.deleteById(id); // Deletes todo from database
    }

}
import java.util.Optional is used to represent optional values that may or may not be present. It is used to avoid null pointer exceptions and to replace null checks with more readable and functional-style code.Step 6: Enabling CORS
Now, we need to enable CORS globally because our frontend and backend both are running on different ports. To enable CORS globally we can create a config package with class WebConfig.
package com.example.sample.config;

import org.springframework.context.annotation.Configuration;
import org.springframework.web.servlet.config.annotation.CorsRegistry;
import org.springframework.web.servlet.config.annotation.WebMvcConfigurer;

@Configuration
public class WebConfig implements WebMvcConfigurer {

    @Override
    public void addCorsMappings(CorsRegistry registry) {
        registry.addMapping("/api/**")
                .allowedOrigins("http://localhost:4200", "https://your-frontend-domain.com")
                .allowedMethods("GET", "POST", "PUT", "DELETE", "PATCH")
                .allowedHeaders("*")
                .allowCredentials(true);
    }
}
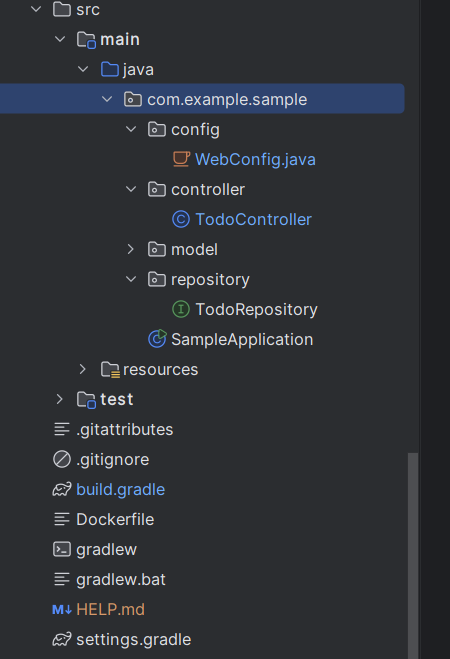
our src directory now will look like this:-
Now we’ll run our backend and see for any possible errors. For that type ./gradlew clean build in the terminal, it will package our backend application and now we can test your API via Postman/Thunder Client.
Part 2: Initializing Frontend
Since, we are using Angular for this project, make sure you have Node installed in your system. If not you can download it from here. After this we’ll move installing angular cli in our system.
Step 1: Open command prompt and type-
npm install -g @angular/cli
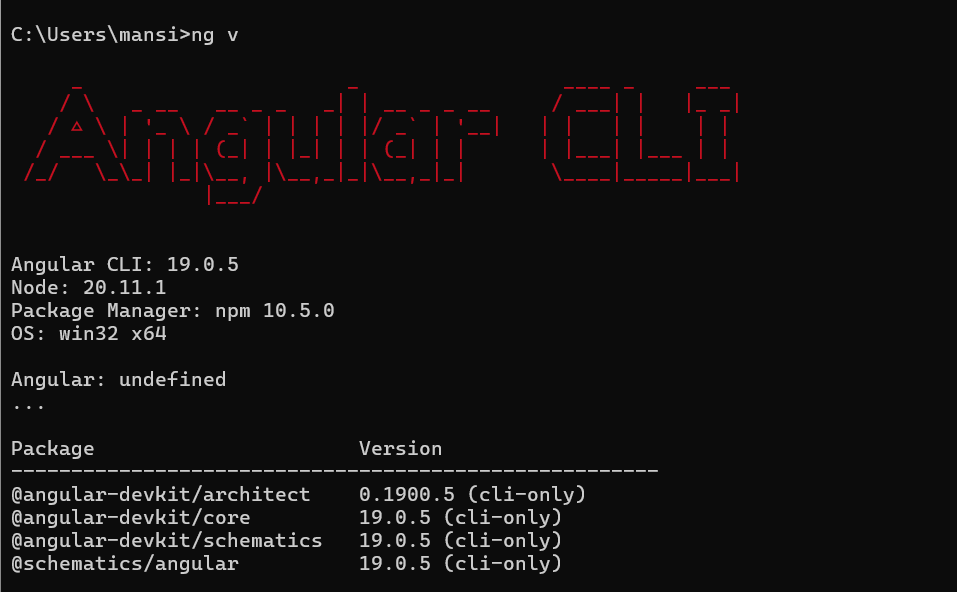
You can check the installation by running the command ng — version or ng v or ng version, it returns the current version of your installed angular CLI.
Step 2: Next, we’ll create a new directory named frontend, inside that we’ll create a new folder todo through the angular ng command. So, first move to the frontend directory in the terminal of IntelliJ.
cd frontend
ng new todo
After running this, you will be presented with some configuration options for your project.Use the arrow and enter keys to navigate and select which options you desire.
If you don’t have any preferences, just hit the enter key to take the default options and continue with the setup.
Step 3: We’ll move to the todo directory( cd todo) and can start the server by running the command
ng serve
It will open in port 4200 showing the default angular page, now we’ll customize it according to our needs.
If we look at the directory structure, then the entry point is main.ts which bootstraps the App component which further uses the template(
app.component.html) and styles(app.component.css).Now we’ll design the UI of our application, in angular we can directly use components within our HTML templates by referencing their “selector” which allows us to embed a component’s view wherever we need it within our application’s HTML structure.
for example in our case, showing the modal for creation/updation of todo can be one component, showing all the todos on the main page can be another one embedded within the app component.
Note: I’m not going through the code of each and every component, it’s the simple HTML(for template), CSS(for styling) and typescript(for all the logic and functioning) within every component.
I’m attaching the Github link for the repository at the end of this article, you can take a look there.
Part 3: Deploying Frontend
We’re going to deploy our frontend on Vercel. We’re going to deploy our project via Vercel CLI.
Step 1: Install Vercel CLI
- If you don’t already have Vercel CLI installed, you can install it globally using npm:
npm install -g vercel
- Verify the installation by running:
vercel — version
Step 2: Login to Vercel
Log in to your Vercel account using the CLI:
vercel login
Step 3: Navigate to our todo directory where our main angular code resides
cd sample/frontend/todo
Step 4: Initialize the Vercel Project by running the command vercel. Vercel will detect your project settings and you’ll be prompted to answer a few questions, such as selecting the scope, setting the root directory etc.
Step 5: After initialization, Vercel will build and deploy your project. You’ll see a live deployment link in the terminal.
Step 6: Once your project is initialized, you can deploy changes with:
vercel --prod
This will push the latest version of your project to production.
Part 4: Deploying Backend
Since Render doesn't support Java/SpringBoot projects natively but still we can deploy on Render. Yes, you heard it right!
We can deploy via creating a Docker image.
Create a Dockerfile:
FROM azul/zulu-openjdk:23-latest
VOLUME /tmp
COPY build/libs/*.jar app.jar
ENTRYPOINT ["java","-jar","/app.jar"]
After creating it, I suggest you go through this guide, it provides a detailed explanation of each and every step to deploy your application on Render.
And wohooo✨, we have created and deployed our basic springboot CRUD application !!
Github Link: https://github.com/MonalikaPatnaik/springboot-TODO
Summary:
This article provides a step-by-step guide on building a simple CRUD (Create, Read, Update, Delete) application using Angular for the frontend and Spring Boot for the backend. It begins with initializing the Spring Boot backend using Spring Initializer, setting up the project in IntelliJ IDEA, and creating the necessary components such as the model, repository, and controller. The article then moves on to setting up the Angular frontend, including installing Angular CLI, creating a new project, and designing the UI. It also covers deploying the frontend on Vercel and the backend on Render using a Docker image.
Thankyou so much for reading! Please do share your thoughts or doubts if any, will happy to answer😊